🧑🏼🏭 Don't mind us, we are still working on this site using NotionCMS! Like this project? Sponsor us on GitHub: ⚡️⚡️⚡️ Get Started ⚡️⚡️⚡️ Getting Started with NotionCMS
🌟 Welcome to the world of NotionCMS! Unlock the true potential of Notion as a headless content management system (CMS) with ease and efficiency. 🌟
NotionCMS empowers you to use Notion as a full-fledged CMS for building dynamic and feature-rich websites and applications. Get ready to harness the power of Notion's content creation capabilities in your web development projects.
By the end of this guide you will have done the following:
- Set up your Notion Database using a template.
- Installed and configured NotionCMS.
- built a tiny static site generator that shows off NotionCMS’s power.
- built a static website from your Notion content.
- Gain an understanding of how NotionCMS can be used to power your projects.
In this tutorial, we use no dependencies besides notionCMS . We are in framework-agnostic land here, but hopefully by following along you will see how flexible and powerful notionCMS is and how it can easily be used in other server rendering applications using any framework you like - it’s Just JavaScript after all.
Prerequisites
- Node.js
Before you begin your journey with NotionCMS, verify that you have Node.js installed on your computer, with a version of 14 or higher. Open your terminal and run the command node --version to check your Node.js version.
If Node.js is not installed or you have a version older than 14, please download and install Node.js before moving forward. If you are asking “what is this Node thing?”, you should read this helpful tutorial first.
- A Notion account
Notion is the backbone of this operation. If you don’t already have a Notion account, go get one stat! You’ll love it, and its absolutely free to start.
Step 1: Create a Notion database that follows the NCMS spec.
Don’t worry, it’s dead simple. Go grab the starter from this link:
Duplicate this into your own Notion workspace and rename it as you wish. There is a handy link to your database id that we will be using in a few steps.
Poke around here to get a feel for the database structure. The only restrictions are the 4 properties: name, Published, Tags, Author, and publishedDate and the fact that this database will be your source of truth.
All Notion content that you want available in your website will need to be in a page here.
If you aren’t familiar with Notion databases, the only things you really need to know to use it with NotionCMS is that:
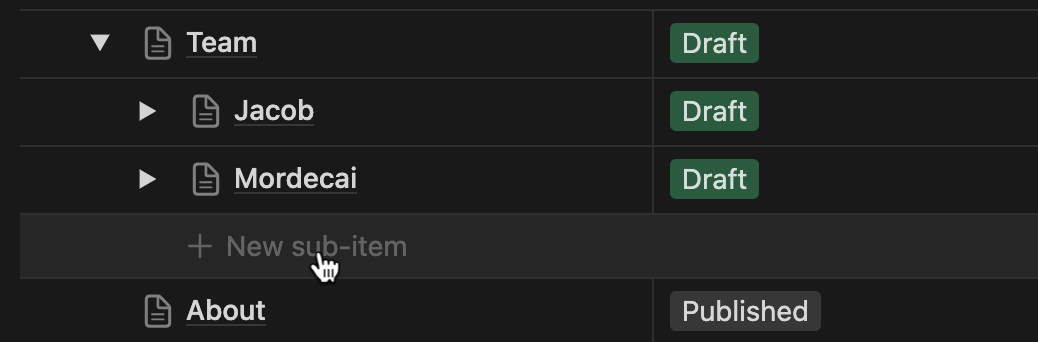
- You can use the dropdown to open a page’s list of sub-pages. It’s ~~turtles ~~pages all the way down from here. What I mean by that is that every page in the database can have child pages. This is important because the child-parent relationship defines your website routes. Here the routes will end up being
/team/jacoband/team/mordecai. - You can add pages with whatever content you want. Make sure to add them where you want them in the hierarchy.
It’s hopefully pretty intuitive from here on out. Add tags, authors, set something to published etc. Once you have some placeholder content, let’s get into some code!
Step 2: Create Your Project Directory
Start by creating a directory for your NotionCMS project. Open your terminal, navigate to your preferred location, and execute the following commands:
mkdir my-notion-cms-project
cd my-notion-cms-project
touch src/build.js src/serve.js .env
Step 3: Install NotionCMS
Install NotionCMS into your project by running the following commands:
npm init -y
npm install @agency-kit/notion-cms --save-dev
Step 4: Import and Configure NotionCMS
Import and Initialize NotionCMS
Here’s the code needed to get NotionCMS working, in index.js:
import NotionCMS from '@agency-kit/notion-cms';

const myCoolCMS = new NotionCMS({
  databaseId: process.env.NOTION_DATABASE_ID,
  notionAPIKey: process.env.NOTION_API_KEY,
});

await notion.pull() // this triggers pulling data from the Notion API
We’ll be using a shell script to grab the .env variables, so if you’re following along, we won’t be using any 3rd party packages, just NotionCMS. As an alternative, you can make sure you have an appropriate way to load the .env file in your project, such as using the dotenv package.
As you can see, we need to go and get a database ID and our Notion API key in order to kick things off.
Create Notion Integration
First, you need to create a Notion integration to get the API key.
- Navigate to Notion's Developer Page.
- Click on the "+ New integration" button.
- Select the workspace where you want to create the integration.
- Click "Submit", and you'll be redirected to a page with the integration details.
- Copy the "Secret Internal Integration Token" – this will be your Notion API key.
Share Integration with Database
- Navigate to the Notion page containing the database you want to access.
- Click the "Share" button on the top right.
- Invite your integration to the database by selecting it under "Invite to Database".
- Grant the integration the appropriate permissions for your use case (Read, Write, etc.). Currently
ncmscan only read from the database, though we have plans forwritefunctionality on the roadmap.
Get Database ID
- Navigate to the Notion database you want to use with your NotionCMS project.
- Click on the "Share" button again to open the Share menu.
- Click the "Copy link" button to copy the URL to your clipboard.
- The database ID is the long string of characters in the URL. It looks something like this:
e4bce5b3-1d3a-4afd-b961-10d56cg436aj. The template Notion page from the link above has acopybutton for easily grabbing the corresponding database ID.
Configure Environment Variables
- Open the
.envfile in your project directory. - Add the following lines:
NOTION_API_KEY=your-notion-api-key-here
NOTION_DATABASE_ID=your-database-id-here
Replace your-notion-api-key-here with your actual Notion API key and your-database-id-here with your Notion database ID.
By following these steps, you have configured NotionCMS with the necessary credentials and linked it to the desired database in your Notion workspace. Now, on to the fun stuff - building the site!
Step 5: Let’s Build an Adorable Little Static Site Generator
The static site generator takes the content from NotionCMS and converts it into HTML files that browsers can read. We'll break this down into a few steps so you can see what’s going on.
Define the Output Folder and HTML Template
First, we need to set up the folder where we will save the generated HTML files, and the template that we will use to create those files.
import fs from 'fs';

const outputFolder = process.argv[2] || './dist'; // Use the provided folder path or default to './dist'

// Define the HTML layout template
const htmlTemplate = (pageTitle: string, pageContent: string) => `
<!DOCTYPE html>
<html lang="en">
<head>
    <meta charset="UTF-8">
    <meta name="viewport" content="width=device-width, initial-scale=1.0">
    <title><p>${pageTitle}</p>
</title></head>
<body>
    <header>
        <h1><p>${pageTitle}</p>
</h1></header>
    <main><p>${pageContent}</p>
</main>
    <footer>
        <p><p>© ${new Date().getFullYear()} Your Website</p>
</p></footer></body></html>
`;
Iterate Through Notion Routes
Next, we need to loop through each route from Notion, building a corresponding HTML file for each one.
for (const route of notion.routes) {
    console.log(`building: ${route}`);

    const routeParts = route.split('/').filter(part => part.trim() !== ''); // Split route into parts
    let currentPath = outputFolder;

    for (const part of routeParts) {
        currentPath = `${currentPath}/${part}`;

        if (!fs.existsSync(currentPath)) {
            fs.mkdirSync(currentPath);
        }
    }

    const pageTitle = notion.data[route].name; // Access the page title using the 'name' property
    const pageContent = notion.data[route].content.html;

    const dataFilePath = `${currentPath}/index.html`;
    const pageHtml = htmlTemplate(pageTitle, pageContent);
    fs.writeFileSync(dataFilePath, pageHtml);
}
Export Data to JSON
Lastly, we will export our data to a JSON file. This can be helpful for debugging or for using this data in other parts of your application. Feel free to peek at the output and get a better feel for the data tree structure.
// Export data to a JSON file
notion.export({ pretty: true, path: './notion-data.json'});
After building your static site, you may want to preview it locally to see how it looks. We'll create a simple HTTP server using Node.js's built-in **http** module.
Create a Local HTTP Server
In your project's src directory, add the following code to serve.js:
import http from 'http';
import path from 'path';
import fs from 'fs';

const server = http.createServer((req, res) => {
  const filePath = path.join(outputFolder, `${req.url}/index.html`);
  fs.readFile(filePath, (err, content) => {
    if (err) {
      res.writeHead(404);
      res.end('Page not found');
    } else {
      res.writeHead(200, { 'Content-Type': 'text/html' });
      res.end(content, 'utf8');
    }
  });
});

const port = process.env.PORT || 8080;

server.listen(port, () => {
  console.log(`Server running at http://localhost:${port}`);
});
Step 6. Build and Preview Your Site
In package.json, we add the following scripts:
"scripts": {
   "build": "env $(cat .env | xargs) node src/build.js",
   "serve": "node src/serve.js"
 }
Now we can run the following commands to build your site and start the local server:
npm run build
npm run serve
Your server will now be running, and you can preview your site by opening your browser and navigating to http://localhost:8080/your-file-path.
🧑🏼🚀
See the full code here: https://github.com/agency-kit/notion-cms-vanilla-ssg
Step 7: Deploy Your Site
When you're ready to share your website with the world, deploy it using your preferred hosting service. Consider using platforms like Netlify, Vercel, or GitHub Pages for seamless deployment.
Exploring NotionCMS Features
NotionCMS brings a host of features to enhance your web development experience:
- Collection-Based CMS Tree: Create a structured CMS tree from your Notion database.
- Static Site Generation: Seamlessly integrate with static site generators.
- Content Formats: Convert Notion blocks to Markdown, plaintext, and HTML.
- Content Caching: Enjoy speedy builds with built-in content caching.
- Plugin Extensibility: Customize workflows with core and custom plugins.
- Custom Renderers: Define your renderers for Notion blocks.
- Tagging and Filtering: Utilize tagging, filtering, path queries, and utilities.
While the above features are all implemented, we have more on the way. Check out our roadmap.
Additional Resources
- Official Documentation: Explore detailed documentation for comprehensive guidance.
- GitHub Repository: Contribute, report issues, and stay updated with NotionCMS development.
Next Steps
Congratulations on embarking on your NotionCMS journey! As you continue building your website, consider these next steps:
- Customization: Tailor templates and styles to match your brand identity.
- Advanced Features: Dive into advanced features and plugins for expanded capabilities.
- Explore Plugins: Extend NotionCMS functionality using existing plugins or create your own.
- Learn More: Dive deeper into the documentation to fully leverage the potential of NotionCMS.
Thank you for checking out NotionCMS. And as always, keep building!
we make notionware. 2023 \c\